

All,
This is my first "How To" so feel free to point out anything that you see that I need to change.
I had ordered some Bilstein shocks from PRG but I did not purchase them with the spring pre-installed. I had read a few tricks and tips here and there, and in addition to a few phone calls to Greg at PRG, I decided to try this myself.
Note: This is somewhat dangerous, so be sure that you want to do this. It is fairly easy, but things could go wrong quickly. I will explain something that did go wrong on my install and it could have been bad. Please take your time and pay attention.
Note 2: All the beer bottles in my pictures were not consumed during installation. I kinda collect different beer bottles, and some of them have collected on my work bench in the garage. The heavy drinking can come after a successful installation!!")
I started out by making a trip to Auto Zone to rent two pairs of strut spring compressors.
AutoZone.com | In Our Stores | Loan-A-Tool Program | Steering And Suspension
Scroll to the bottom on the above link.
This is what they look like
![Image]()
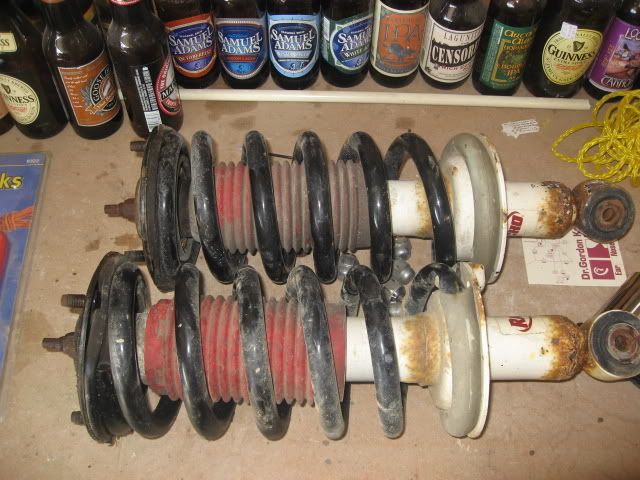
Remove the stock suspension from both sides. (sorry, I am not including this procedure in my how to)
![Image]()
Note the orientation of the top 3 mounts screws compared to the bottom shock mount. You will need this same orientation when re-installing the new shocks. I will explain this further as we go on.
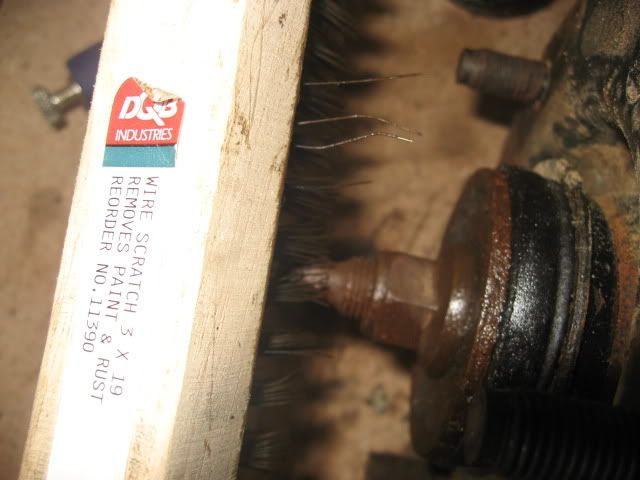
Before I started compressing the springs I took the time to clean the threads on the top of the stock washers, and on top of the stock shock bolt. This will make removing the lock nut from the top much easier. I used a wire brush and a Dremel with a wire brush attachment.
![Image]()
Now it is time to compress the springs. It was suggested to me to use 3 of the spring compressors on the spring, however, since I had rented 2 pairs from Autozone, I went ahead and used all 4. I attached them as such. (there is a 4th compressor that you can not see behind the shock assembly)
![Image]()
In order to compress the spring, I turned each spring compressor about 1/2 turn at a time using a 3/4" open end wrench. This process took about 20-30 minutes until I had some "play" in my spring. I was able to stick a screw driver under the spring at the spring seat and move it around. At that time I started to remove the upper washer assembly. The upper washer assembly as I call it includes the washer that sits on the spring with the three studs sticking out of it that mount to the coil bucket, a rubber diaphragm, another smaller washer, and the lock nut.
![Image]()
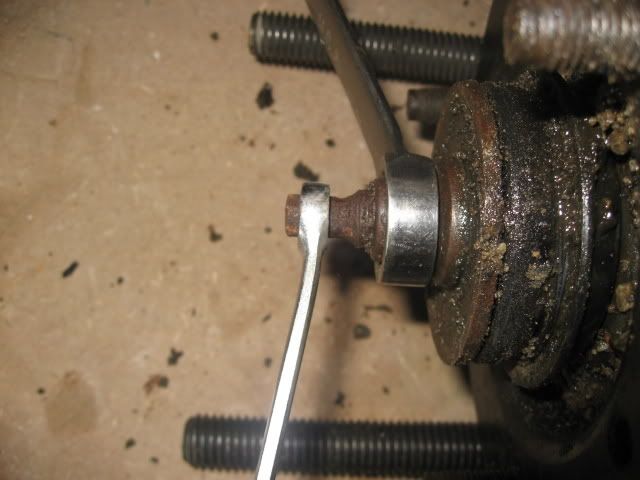
In order to do this you need an 8mm and 17mm open/box end wrenches.
Use the 8mm wrench to hold the shaft, and the 17mm to remove the lock nut.
![Image]()
I had attempted the above before I cleaned up the threads, and ended up stripping the closed end of my 8mm wrench. After I cleaned the threads up I used a small pair of vice grip pliers instead of the 8mm wrench and that worked just fine.
Now once the top washer assembly is off take a few seconds to clean all the crap off of it, but keep all the parts together. They go back on with the new shocks.
Your old shocks will just pull out of the spring from the bottom, and you can slide the new shocks right back in to place. Make sure you include the washer that comes with the Bilsteins. It goes under the stock top washer assembly.
![Image]()
Note that the bottom spring seat on the Bilsteins is able to rotate around the shock, you need to make sure that the "step" on that spring seat is facing out on the shock. An easy way to do this is to picture how the shock came out. The bottom mount hole of the shock faces front to back on the truck, you want the step to face the tire. I apologize I did not get a good picture of this, but if you look at your stock shocks you can see the orientation of the step.
Once the step is lined up correctly, seat the spring on the shock, then seat the top washer assembly back on the spring. By looking at the bottom of the top washer assembly, you can see where the washer sits on the end of the spring. If you line that back up when you sit the washer assembly back on, you will then be lined up when you re-mount the shock on the truck.
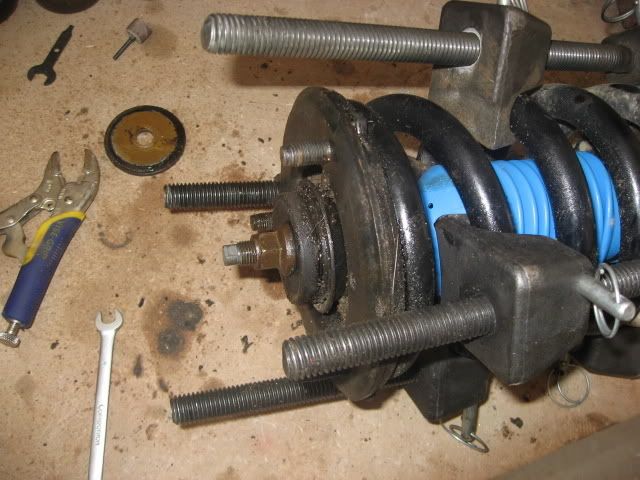
Place the stock lock nut back on the top of the shock, and use your 8mm/17mm combo to tighten the nut back down. Make sure the metal spacer is between the nut and the rubber diaphragm. This is the huge mistake I made on my first shock because I got in a hurry. Note the picture below. Notice the metal washer in the top left of the photo in front of the vice grips. And also notice the nut tightened on top of the rubber diaphragm. A big NO-NO!
![Image]()
I caught it before I released the springs. I got very lucky.
Once it is all assembled, I started loosening the spring compressors. Once again going very slowly, and continuing to make sure everything lines up. Then, when the spring compressors are off, I did a little clean up of the assembly, coil bucket, and shock mount, then I put it back on the truck.
Please let me know if you have any questions or comments.
Thanks,
Zack
This is my first "How To" so feel free to point out anything that you see that I need to change.
I had ordered some Bilstein shocks from PRG but I did not purchase them with the spring pre-installed. I had read a few tricks and tips here and there, and in addition to a few phone calls to Greg at PRG, I decided to try this myself.
Note: This is somewhat dangerous, so be sure that you want to do this. It is fairly easy, but things could go wrong quickly. I will explain something that did go wrong on my install and it could have been bad. Please take your time and pay attention.
Note 2: All the beer bottles in my pictures were not consumed during installation. I kinda collect different beer bottles, and some of them have collected on my work bench in the garage. The heavy drinking can come after a successful installation!!
I started out by making a trip to Auto Zone to rent two pairs of strut spring compressors.
AutoZone.com | In Our Stores | Loan-A-Tool Program | Steering And Suspension
Scroll to the bottom on the above link.
This is what they look like

Remove the stock suspension from both sides. (sorry, I am not including this procedure in my how to)
Note the orientation of the top 3 mounts screws compared to the bottom shock mount. You will need this same orientation when re-installing the new shocks. I will explain this further as we go on.
Before I started compressing the springs I took the time to clean the threads on the top of the stock washers, and on top of the stock shock bolt. This will make removing the lock nut from the top much easier. I used a wire brush and a Dremel with a wire brush attachment.
Now it is time to compress the springs. It was suggested to me to use 3 of the spring compressors on the spring, however, since I had rented 2 pairs from Autozone, I went ahead and used all 4. I attached them as such. (there is a 4th compressor that you can not see behind the shock assembly)
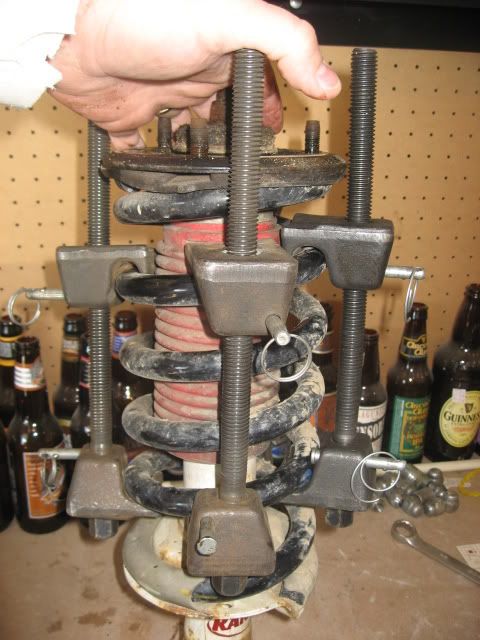
In order to compress the spring, I turned each spring compressor about 1/2 turn at a time using a 3/4" open end wrench. This process took about 20-30 minutes until I had some "play" in my spring. I was able to stick a screw driver under the spring at the spring seat and move it around. At that time I started to remove the upper washer assembly. The upper washer assembly as I call it includes the washer that sits on the spring with the three studs sticking out of it that mount to the coil bucket, a rubber diaphragm, another smaller washer, and the lock nut.
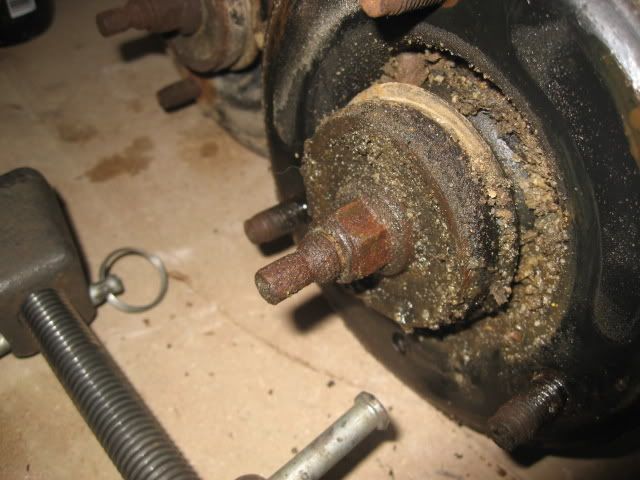
In order to do this you need an 8mm and 17mm open/box end wrenches.
Use the 8mm wrench to hold the shaft, and the 17mm to remove the lock nut.
I had attempted the above before I cleaned up the threads, and ended up stripping the closed end of my 8mm wrench. After I cleaned the threads up I used a small pair of vice grip pliers instead of the 8mm wrench and that worked just fine.
Now once the top washer assembly is off take a few seconds to clean all the crap off of it, but keep all the parts together. They go back on with the new shocks.
Your old shocks will just pull out of the spring from the bottom, and you can slide the new shocks right back in to place. Make sure you include the washer that comes with the Bilsteins. It goes under the stock top washer assembly.

Note that the bottom spring seat on the Bilsteins is able to rotate around the shock, you need to make sure that the "step" on that spring seat is facing out on the shock. An easy way to do this is to picture how the shock came out. The bottom mount hole of the shock faces front to back on the truck, you want the step to face the tire. I apologize I did not get a good picture of this, but if you look at your stock shocks you can see the orientation of the step.
Once the step is lined up correctly, seat the spring on the shock, then seat the top washer assembly back on the spring. By looking at the bottom of the top washer assembly, you can see where the washer sits on the end of the spring. If you line that back up when you sit the washer assembly back on, you will then be lined up when you re-mount the shock on the truck.
Place the stock lock nut back on the top of the shock, and use your 8mm/17mm combo to tighten the nut back down. Make sure the metal spacer is between the nut and the rubber diaphragm. This is the huge mistake I made on my first shock because I got in a hurry. Note the picture below. Notice the metal washer in the top left of the photo in front of the vice grips. And also notice the nut tightened on top of the rubber diaphragm. A big NO-NO!
I caught it before I released the springs. I got very lucky.
Once it is all assembled, I started loosening the spring compressors. Once again going very slowly, and continuing to make sure everything lines up. Then, when the spring compressors are off, I did a little clean up of the assembly, coil bucket, and shock mount, then I put it back on the truck.
Please let me know if you have any questions or comments.
Thanks,
Zack


