

Hey guys,
Here is my latest tutorial/ walk through. I have been wanting to install HID's but I did not want to glare other drivers. I know there is an arguement on whether or not our headlights cause excessive glare, but I dont want to dive into that. I decided to make this tutorial because I havent seen one made yet for these. I have seen finished product pictures (as others have retrofitted these same projectors before), but not a step by step.
I bought some of those easy to install projector units from theretrofitsource. These are the morimoto mini h1's. These are not top of the line, but are easy to install and require little to no modification. I got tired of looking around and seeing companies charge 300+ just to retrofit other peoples headlights. I figured I would write a tutorial for our specific headlights and show how easy it is to install these.
There are other options for projectors to retrofit, but I chose these because they are almost literally, insert and tighten. Other projectors have wider output, different color, etc (like any other accessory with different features) but require you to cut, drill or otherwise modify your lights in order to use them. These mini h1 projectors are still way better than projectors that come in other aftermarket projector headlights. And these are made for HID lights as well, unlike the other projector titan headlights which obviously are not made for HID's since they come with Halogen bulbs originally.
I will update this thread as I edit my tutorial, but here is a sneak peek.
![Image]()
UPDATE:
Ok so here is the first part of the tutorial.
First you have to open up your headlights. If you do not know how to do this, this thread has a very good walk-though.
http://www.titantalk.com/forums/tit...n-faq-howto-area/85091-how-headlight-mod-painting-inner-housing-our-lights.html
So you go from this:
![Image]()
To this:
![Image]()
I have to give props to SD_Titan. Since I live close by, he helped me with the opening of my lights (and painting).
Now looking at the headlights, if you are going to be installing the projector in the low beam (like in this tutorial), you need to remove the factory halogen bulb reflector. That is, the little cup that is in front of the light bulb shown in this picture.
![Image]()
Since I wanted to mod my headlights with as little modification as possible, I decided to take out this piece intact. I found that wiggling the piece firmly up and down (from the front of the headlight to the back) freed the piece up after a few "wiggles" as shown in this video.
After this piece is removed, you have easy access to add the projector through the original bulb hole.
To continue with the retrofit, you have to remove the plastic/rubber piece that actually holds the bulb in place. This is the piece where the stock bulb would turn and lock. The middle is plastic and the outer is rubber as it is what seals the headlight from behind.
This piece is attached by 3 points where is clips on into the headlight reflector bucket. (Its sorta hard to explain, but the photo shows what im talking about). Once attachment area is where the little arrow is and they are 2 more.
![Image]()
I eventually found it easier to pull back on the rubber seal to free it from the headlight and then pry at the 3 attachment points. Just pull at the outer end of the rubber seal (carefully, as to not tear it!) like this.
![Image]()
Then take a screwdriver or something flat and pry at the three attachment points. This video should clear this up. As you can see, it popped off easily once I extended the rubber seal in the later half of the video.
After these steps you should be ready to start fitting the projector.
This would be a good time to do any other modifications or painting to the headlight buckets themselves. For example, I asked SD_Titan to paint the reflector buckets behind the projector since they obviously wouldn't be needed to "reflect" anything anymore once the projectors were installed.
Here is the overview of the projector I received from TheRetrofitSource.
Side View:
![Image]()
Rear View:
![Image]()
First step would be to remove the rear bulb holder. You can do this by removing the 3 screws holding this part down as shown in this picture.
![Image]()
After that piece is removed, you can remove the lock nut. This is the lock nut that will be holding the projector in place once it is installed in the headlight. My projectors came with the newest version, which can be tightened with a socket (with flat sides). There are older and other projectors that come with the older style lock nut which doesn't have nice flat sides but it serves the same purpose.
Now you can get ready to insert the projector into the headlight housing. The projector should come with two rubber/silicone washers, one large and once smaller. Insert the larger rubber washer on the back of the projector as shown here.
![Image]()
![Image]()
****NOTE**** if you are using a shroud that screws in place, then this would be the time to put it on unless you want to remove the projector later. For example, my projectors came with a "mini gaitling" shroud, but I didnt use it because I felt it was too small for our headlights. I ended up buying separate larger shrouds that can be attached at the final stages since they are not screwed into the projector housing.
Also, if you plan to paint the reflector behind the projector, now would also be the time. Some installers prefer to paint the bucket behind the projector black for looks and to prevent any leaking light to reflect off the chrome surface. This step is a preference. I had Joe paint mine black with Plasti-dip in case later on I want chrome again. You will see the results in the later stages of how it looks.
Once this is done, you can insert the projector in the headlight through the original bulb hole. Dont forget to make sure you stick it in right side up :eyebrow:
The large washer should sit between the projector and headlight bucket as shown.
![Image]()
Now look at the backside of the headlight and you will see that the projector threads are sticking out the back side of the projector (Duh!).
Here is where you should decide whether or not you think there is enough thread. Since I wanted to do as little modification as possible to the actual headlights, I felt there was enough thread to lock it down securely (after numerous test fits). If you feel there is not enough, you could sand down the back of the headlight bucket if felt that it was necessary. I did not think so, so I left it as is.
Now you take the smaller rubber/silicone washer and insert it over the projector threads.
![Image]()
![Image]()
The projectors came with a metal washer as well. This part goes over the smaller rubber/silicone washer. The metal washer has a little tab that fits into an indent on the projector threads. Basically, the part that is cut goes on top as shown in the picture.
![Image]()
Here is why you need to test fit everything. As you will notice, there is a part of the back of the headlight bucket that interferes with how the metal washer fits. You could do two things, grind down the tab on the headlight, or grind down the metal washer. I decided to grind down the washer instead. I took a rough mark as to where it was rubbing against the headlight tab and marked it with a sharpie. I then took a file to it and ground it down.
Rubbing location:
![Image]()
Marking the area needing removal:
![Image]()
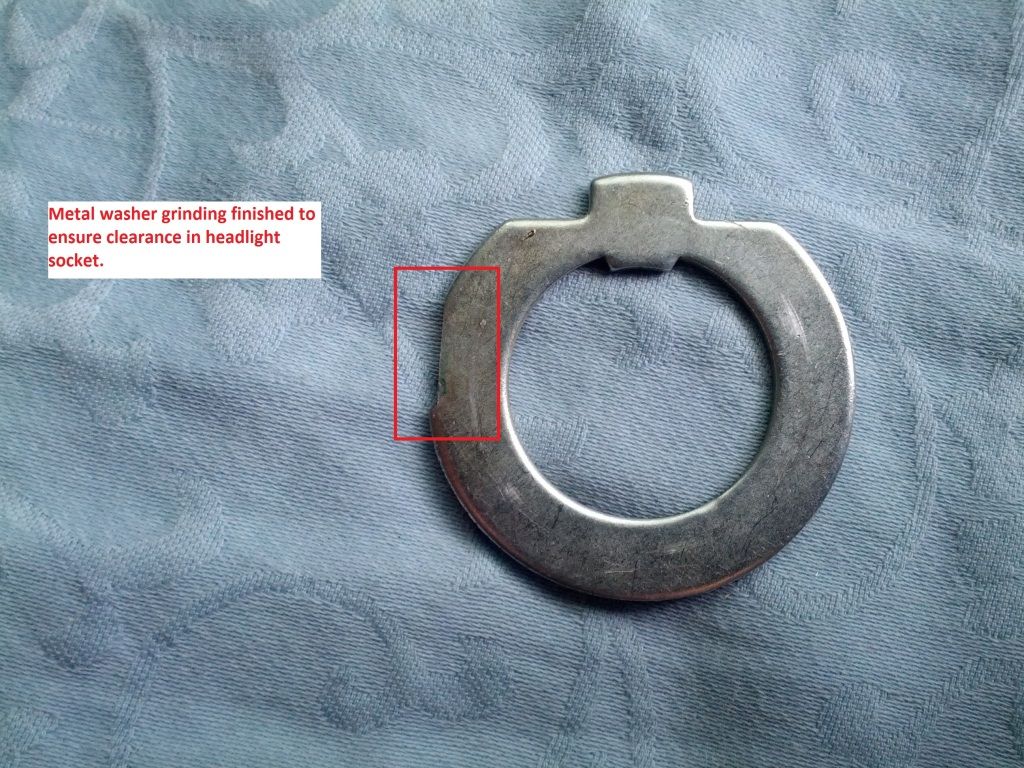
End result:
![Image]()
It may take some trial and error to get enough clearance.
After grinding down the washer enough, you should be left with a washer that allows clearance on the headlight tab. Once enough clearance is verified, you can place the washer over the smaller rubber/silicone washer.
It should look like this:
![Image]()
Now you can attach the lock washer in place and start tightening it down (but not to final "tightness" yet). I recommend tightening it down a good amount, you will need the threads of the projector to clear in order to reinstall the bulb holder. You want it loose enough that you can twist the projector, but tight enough that if you rotate the projector (while aiming) it stays in place.
![Image]()
You can also reinstall the projector bulb holder bracket since you will be needing to test the output and need to reinstall the bulb holder to insert the bulb.
Now, since this type of projector installs through the OEM bulb socket, you need to ensure that the cutoff will be straight. Since it attaches this way, during installation, there is no definite way to tell whether or not the cutoff is nice and level. You do not want your cutoff to be off rotation ( looking slanted). The height of the cutoff will be controlled by the OEM headlight adjustment, but this rotational alignment needs to be done by hand. This is completed by "rotating" the projector by hand (after loosening the lock nut) after testing.
Since I dont have my H1 HID kit yet (these specific projectors require H1 bulbs), this part will be explained once I receive my HID kit.
So here is a quick overview of the steps so far.
The steps left for install is to:
I know the tutorial isnt finished yet, but I hope its a good enough overview of what is required. The only parts really left is aiming and resealing the headlights. The actual install of the projectors probably took me 1 hour for the first side (since i was taking pictures as well) and like 30 minutes for the second side.
Honestly, the job with these "plug and play" type projectors is very easy. Like I said earlier, there are other projectors that are better, but these are still very respectable and better than projectors in aftermarket projector headlights like Spyders. Plus, with these, you do not have to do any major cutting or drilling for the install since they slide through the OEM bulb socket.
Here is my latest tutorial/ walk through. I have been wanting to install HID's but I did not want to glare other drivers. I know there is an arguement on whether or not our headlights cause excessive glare, but I dont want to dive into that. I decided to make this tutorial because I havent seen one made yet for these. I have seen finished product pictures (as others have retrofitted these same projectors before), but not a step by step.
I bought some of those easy to install projector units from theretrofitsource. These are the morimoto mini h1's. These are not top of the line, but are easy to install and require little to no modification. I got tired of looking around and seeing companies charge 300+ just to retrofit other peoples headlights. I figured I would write a tutorial for our specific headlights and show how easy it is to install these.
There are other options for projectors to retrofit, but I chose these because they are almost literally, insert and tighten. Other projectors have wider output, different color, etc (like any other accessory with different features) but require you to cut, drill or otherwise modify your lights in order to use them. These mini h1 projectors are still way better than projectors that come in other aftermarket projector headlights. And these are made for HID lights as well, unlike the other projector titan headlights which obviously are not made for HID's since they come with Halogen bulbs originally.
I will update this thread as I edit my tutorial, but here is a sneak peek.

UPDATE:
Ok so here is the first part of the tutorial.
First you have to open up your headlights. If you do not know how to do this, this thread has a very good walk-though.
http://www.titantalk.com/forums/tit...n-faq-howto-area/85091-how-headlight-mod-painting-inner-housing-our-lights.html
So you go from this:

To this:

I have to give props to SD_Titan. Since I live close by, he helped me with the opening of my lights (and painting).
Now looking at the headlights, if you are going to be installing the projector in the low beam (like in this tutorial), you need to remove the factory halogen bulb reflector. That is, the little cup that is in front of the light bulb shown in this picture.

Since I wanted to mod my headlights with as little modification as possible, I decided to take out this piece intact. I found that wiggling the piece firmly up and down (from the front of the headlight to the back) freed the piece up after a few "wiggles" as shown in this video.
After this piece is removed, you have easy access to add the projector through the original bulb hole.
To continue with the retrofit, you have to remove the plastic/rubber piece that actually holds the bulb in place. This is the piece where the stock bulb would turn and lock. The middle is plastic and the outer is rubber as it is what seals the headlight from behind.
This piece is attached by 3 points where is clips on into the headlight reflector bucket. (Its sorta hard to explain, but the photo shows what im talking about). Once attachment area is where the little arrow is and they are 2 more.

I eventually found it easier to pull back on the rubber seal to free it from the headlight and then pry at the 3 attachment points. Just pull at the outer end of the rubber seal (carefully, as to not tear it!) like this.

Then take a screwdriver or something flat and pry at the three attachment points. This video should clear this up. As you can see, it popped off easily once I extended the rubber seal in the later half of the video.
After these steps you should be ready to start fitting the projector.
This would be a good time to do any other modifications or painting to the headlight buckets themselves. For example, I asked SD_Titan to paint the reflector buckets behind the projector since they obviously wouldn't be needed to "reflect" anything anymore once the projectors were installed.
Here is the overview of the projector I received from TheRetrofitSource.
Side View:

Rear View:

First step would be to remove the rear bulb holder. You can do this by removing the 3 screws holding this part down as shown in this picture.

After that piece is removed, you can remove the lock nut. This is the lock nut that will be holding the projector in place once it is installed in the headlight. My projectors came with the newest version, which can be tightened with a socket (with flat sides). There are older and other projectors that come with the older style lock nut which doesn't have nice flat sides but it serves the same purpose.
Now you can get ready to insert the projector into the headlight housing. The projector should come with two rubber/silicone washers, one large and once smaller. Insert the larger rubber washer on the back of the projector as shown here.


****NOTE**** if you are using a shroud that screws in place, then this would be the time to put it on unless you want to remove the projector later. For example, my projectors came with a "mini gaitling" shroud, but I didnt use it because I felt it was too small for our headlights. I ended up buying separate larger shrouds that can be attached at the final stages since they are not screwed into the projector housing.
Also, if you plan to paint the reflector behind the projector, now would also be the time. Some installers prefer to paint the bucket behind the projector black for looks and to prevent any leaking light to reflect off the chrome surface. This step is a preference. I had Joe paint mine black with Plasti-dip in case later on I want chrome again. You will see the results in the later stages of how it looks.
Once this is done, you can insert the projector in the headlight through the original bulb hole. Dont forget to make sure you stick it in right side up :eyebrow:
The large washer should sit between the projector and headlight bucket as shown.

Now look at the backside of the headlight and you will see that the projector threads are sticking out the back side of the projector (Duh!).
Here is where you should decide whether or not you think there is enough thread. Since I wanted to do as little modification as possible to the actual headlights, I felt there was enough thread to lock it down securely (after numerous test fits). If you feel there is not enough, you could sand down the back of the headlight bucket if felt that it was necessary. I did not think so, so I left it as is.
Now you take the smaller rubber/silicone washer and insert it over the projector threads.


The projectors came with a metal washer as well. This part goes over the smaller rubber/silicone washer. The metal washer has a little tab that fits into an indent on the projector threads. Basically, the part that is cut goes on top as shown in the picture.

Here is why you need to test fit everything. As you will notice, there is a part of the back of the headlight bucket that interferes with how the metal washer fits. You could do two things, grind down the tab on the headlight, or grind down the metal washer. I decided to grind down the washer instead. I took a rough mark as to where it was rubbing against the headlight tab and marked it with a sharpie. I then took a file to it and ground it down.
Rubbing location:

Marking the area needing removal:

End result:
It may take some trial and error to get enough clearance.
After grinding down the washer enough, you should be left with a washer that allows clearance on the headlight tab. Once enough clearance is verified, you can place the washer over the smaller rubber/silicone washer.
It should look like this:

Now you can attach the lock washer in place and start tightening it down (but not to final "tightness" yet). I recommend tightening it down a good amount, you will need the threads of the projector to clear in order to reinstall the bulb holder. You want it loose enough that you can twist the projector, but tight enough that if you rotate the projector (while aiming) it stays in place.

You can also reinstall the projector bulb holder bracket since you will be needing to test the output and need to reinstall the bulb holder to insert the bulb.
Now, since this type of projector installs through the OEM bulb socket, you need to ensure that the cutoff will be straight. Since it attaches this way, during installation, there is no definite way to tell whether or not the cutoff is nice and level. You do not want your cutoff to be off rotation ( looking slanted). The height of the cutoff will be controlled by the OEM headlight adjustment, but this rotational alignment needs to be done by hand. This is completed by "rotating" the projector by hand (after loosening the lock nut) after testing.
Since I dont have my H1 HID kit yet (these specific projectors require H1 bulbs), this part will be explained once I receive my HID kit.
So here is a quick overview of the steps so far.
- Open headlights
- Remove OEM bulb reflector cap
- Remove rear rubber grommet, OEM bulb holder
- Prep projector (remove bulb holder screws, insert large rubber washer)
- Insert projector through headlight, insert smaller rubber washer
- Insert, modify metal washer for fitment
- Insert lock washer and do initial tightening + reinstall projector bulb holder
The steps left for install is to:
- ensure rotational alignment.
- Final lock nut tightening
- installation of the factory rubber grommet (some modification needed depending on the type of lock nut, but I will get to that in part 2)
- Shroud installation ( This is a variable depending on the type of shroud used, may involve some cutting and test fitting)
- Resealing of the headlights
- final output check/ height adjustment
I know the tutorial isnt finished yet, but I hope its a good enough overview of what is required. The only parts really left is aiming and resealing the headlights. The actual install of the projectors probably took me 1 hour for the first side (since i was taking pictures as well) and like 30 minutes for the second side.
Honestly, the job with these "plug and play" type projectors is very easy. Like I said earlier, there are other projectors that are better, but these are still very respectable and better than projectors in aftermarket projector headlights like Spyders. Plus, with these, you do not have to do any major cutting or drilling for the install since they slide through the OEM bulb socket.


")


